1. Technique and normal structures
In routine US examinations of the wrist,
the patient should be sitting down,
with both hands and elbows placed on the examination table.
A high frequency transducer must be used (at least 12 MHz),
as most evaluated structures are superficial.
A normal examination of the wrist begins with the assessment of the dorsal aspect followed by the ventral aspect of the wrist.
The scanning of the contralateral wrist is often useful to detect asymmetries between normal and pathological wrists.
Normal tendons appear as echogenic structures with multiple parallel lines in the longitudinal axis and dots in the transverse axis,
surrounded by anechoic synovial fluid and the tendon shed,
usually depicted as a thin echogenic line.
Nerves are shown as parallel multiple hypoechoic areas,
the fascicles,
surrounded by an echogenic shed,
the perineurium.
On a transverse plane,
nerves have a “honeycomb-like” appearance.
The interaction between the US beam and the different structures of the wrist may cause beam reflections that stray from the transducer.
This generates areas of apparent reduction of echogenicity,
known as anisotropy artifacts.
To avoid this pitfall,
the transducer should be placed along the longitudinal axis of the tendon or ligament in question and rocked back and forwards; if the hypoechogenicity persists,
an abnormality is present.
Although less common,
anisotropy may also be seen in nerves.
2. Dorsal Wrist
The standard US examination of the wrist begins with the assessment of its dorsal side,
with the transducer placed in a transverse plane for proper identification of the extensor tendons.
The hand may be placed on a gel tube for a better dynamic assessment as it frees the movement of the fingers and corresponding tendons.
The two main topographical markers of a US of the wrist are the Lister tubercle,
an osseous prominence in the distal radius,
and the extensor retinaculum,
a fibrous band that crosses the extensor aspect of the wrist whose attachments divide the wrist in six separate compartments (Fig.
1).
Remembering the names of all tendons of the extensor side may prove to be quite difficult: a helpful tip is to keep in mind that the names alternate from longus to brevis (eg.
abductor pollicis longus,
extensor pollicis brevis,
extensor pollicis longus….).
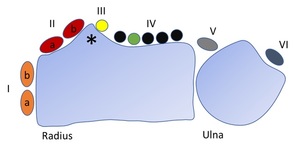
Fig. 1: Schematic display of the extensor tendon compartments. The roman numerals represent the different compartments. Ia – APL tendon; Ib – EPB tendon IIa – ECRB tendon; IIb – ECRL tendon; IV black – ECD tendon; IV green – EIP tendon; V – EDQ tendon; IV – ECU tendon; Asterisk – Lister tubercle.
2.1 First compartment
The first compartment,
the most radial,
is lateral to the styloid process and contains two tendons: the more dorsal extensor pollicis brevis (EPB) and the abductor pollicis longus (APL).
These tendons,
along with the extensor pollicis longus on the third compartment,
form the boundaries of the anatomic snuff-box,
a triangular deepening crossed by the radial artery (Fig.
2).
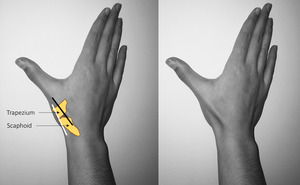
Fig. 2: Anatomical snuff box. The extensor pollicis brevis and the abductor pollicis longus tendons (black line) form the medial border and extensor pollicis longus tendon (white line) forms the lateral border of the anatomical snuff box. The floor is formed by the scaphoid and trapezium bones.
With the wrist halfway between supination and pronation and the fifth digit and the examination table,
the transducer should be placed over the lateral radial styloid.
The extensor retinaculum is depicted as a hypoechoic line over the tendons and should be thoroughly examined as a thick fibrous septum,
originating in the extensor retinaculum and separating the compartment in two,
may be present (Fig.
3).
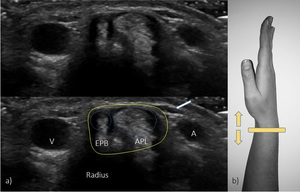
Fig. 3: US transverse view of the first compartment. EPB – extensor pollicis brevis; ALP – abductor pollicis longus; A – radial artery; V – radial vein; white arrow – superficial branch of the radial nerve; yellow line – retinaculum.
2.2 Second compartment
Located on the radial side of the Lister tubercle,
this compartment houses the extensor radialis longus (ECRL) and the extensor carpi radialis brevis (ECRB) tendons.
These tendons insert in the second and third proximal metacarpal bones,
respectively.
The examination is performed with the hand down and with the probe in the transverse plane over the radial styloid and should include a proximal sweep to include the respective muscles (Fig.
4).
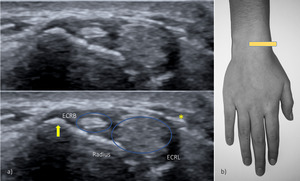
Fig. 4: US transverse view of the second compartment. ECRL – extensor carpi radialis longus; ECRB – extensor carpi radialis brevis; yellow arrow – Lister Tubercle; asterisk – tendons of the first compartment crossing superficial to the tendons of the second compartment.
When sweeping proximally,
the first compartment tendons are likely to be recognised crossing superficially the second compartment (Fig.
5.)
2.3 Third compartment
This compartment is located on the ulnar side of the Lister tubercle and in it lies the extensor pollicis longus tendon (EPL).
This tendon crosses the ECRL and the ECRB and inserts in the thumbs distal phalanx.
For the assessment of the third compartment the probe is placed over the Lister tubercle and the EPL should be followed in its entire extension as it crosses the second compartment tendons (Fig.
6).
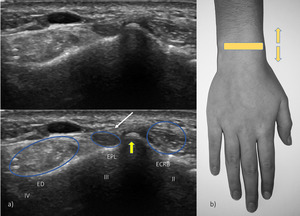
Fig. 6: US transverse view of the third, partial second and fourth compartments. EPL – extensor pollicis longus; ECRB – extensor carpi radialis brevis; ED – extensor digiturom; yellow arrow – Lister tubercle; thin white arrow – extensor retinaculum.
2.4 Fourth compartment
The fourth compartment houses the extensor digitorum communis (EDC) and the extensor indicis proprius (EIP).
The extensor retinaculum reaches its maximum thickness over this compartment.
Proper examination requires probe placement in the mid dorsal wrist and dynamic scanning for optimal tendon differentiation (Fig.
7).
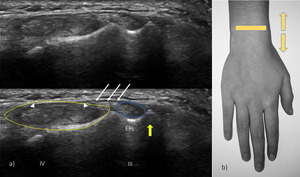
Fig. 7: US transverse view of the third and fourth compartments. EPL – extensor pollicis longus; yellow line – IV compartment of extensor tendons, seen as arrowheads (extensor digitorum communis and extensor indicis proprius); yellow arrow – Lister tubercle; thin white arrows – extensor retinaculum.
2.5 Fifth compartment
The fifth compartment lies over the distal radio-ulnar joint and contains the extensor digiti minimi tendon (EDM) (Fig.
8).
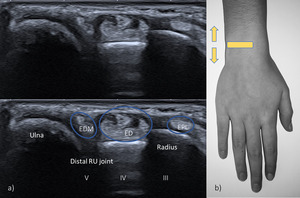
Fig. 8: US transverse view of the fifth, fourth and third compartments. EPL – extensor pollicis longus; ED - extensor digitorum; EDM – extensor digiti minimi. Notice the EDM tendon over the interval between the radius and ulna.
2.6 Sixth compartment
The sixth compartment lies between the head and styloid process of the ulna and contains the extensor carpi ulnaris tendon (ECU),
a tendon visible in a concave sulcus in the ulna.
The wrist should be placed in slight radial deviation,
thumb-side down (Fig.
9).
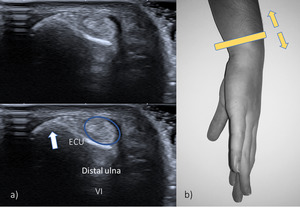
Fig. 9: US transverse view of the sixth compartment. ECU - extensor carpi ulnaris. The tendon rests in a shallow groove near the styloid process of the ulna (white arrow).
The triangular fibrocartilage is a biconcave disk that acts as a meniscus homologue,
and is located between the ulnar styloid and the radius.
As such,
it may also be visualized in the sixth compartment,
deep to the ECU tendon,
appearing as an echogenic triangle.
It is best visualized with the forearm proned and the humerus rotated internally.
The transducer is then placed in a longitudinal plane over the lateral dorsum wrist to identify the bone contours of the distal ulna and then moved to a longitudinal paracoronal plane (Fig.
10).
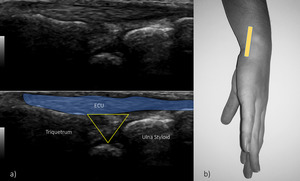
Fig. 10: US longitudinal view of the sixth compartment. ECU – extensor carpi ulnaris; yellow triangle – triangular fibrocartilage. Echogenic triangular fibrocartilage can be seen deep to the ECU tendon.
2.7 Intrinsic ligaments of the wrist
The US examination of the wrist can also assess (at least in part) the two most important intrinsic ligaments of the wrist: the scapholunate and the lunatotriquetral ligaments.
They play an essential role as stabilizers of the proximal carpal row during wrist movement.
By placing the probe distally from the Lister tubercle on a transverse plane,
the dorsal part of the scapholunate ligament can be visualized (Fig.
11).
If the probe is then turned to the ulnar side,
the lunatutriquetral ligament can be seen (Fig.
12).
Ulnar and radial deviations of the wrist can be helpful for the examination.
Both structures share a similar appearance,
being depicted as triangular echogenic formations between the corresponding bones.
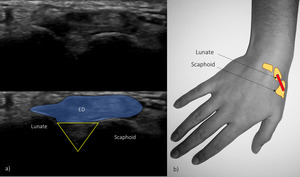
Fig. 11: Transverse US of the dorsal aspect of the proximal carpal bones.
ED – extensor digitoum; yellow triangle - scapholunate ligament.
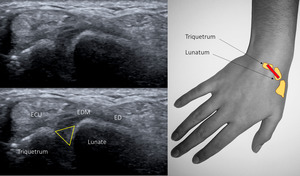
Fig. 12: Transverse US of the dorsal aspect of the proximal carpal bones.
ED – extensor digitoum; ECU – extensor carpi ulnaris; EDM – extensor digiti minimi; yellow triangle - scapholunate ligament
2.8 Radiocarpal and midcarpal joints
The longitudinal aspect of the carpal joints can also be assessed in the US,
in a long-axis plane.
While assessing these joints,
the radiologist should look for effusion or synovial irregularities (Fig.
13).
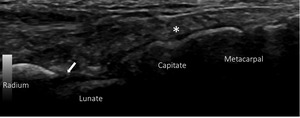
Fig. 13: Longitudinal US of the radiocarpal and midcarpal joints. Asterisk – longitudinal ED tendon; white arrow - recess of the radiocarpal joint.
3. Ventral wrist
For the assessment of the ventral aspect,
the patient should place the dorsal wrist on the examination table with the forearm in supination.
The flexor tendons will be easily identified in this position.
The defining anatomical structure in the flexor surface is the flexor retinaculum (or transverse carpal ligament) a thin,
fibrous band of approximately 1,5mm.
It is attached to the pisiform and the hamatum medially and laterally to the scaphoid and the trapezium.
3.1 Proximal carpal tunnel
The examiner must begin the assessment of the proximal carpal tunnel by identifying the two bony landmarks,
the scaphoid tubercle and pisiform bones,
showing them in a single image.
The probe should then be placed in the transverse position,
tilting it back and forward to distinguish the median nerve from the adjacent tendons.
The flexor retinaculum appears as an hypoechogenic band over the flexor tendons and the medial nerve.
The nine long flexors tendons are divided in: four from the flexor digitorum superficialis,
four from the flexor digitorum profundus and flexor pollicis longus tendon radially.
Dynamic imaging is paramount in the assessment of the flexor tendons.
The median nerve is a superficial structure,
laying parallel to the second and third flexor tendons and medial to the flexor pollicis longus tendon,
below the flexor retinaculum (Fig.
14).
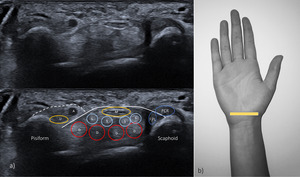
Fig. 14: Transverse ultrasonographic appearance of the proximal carpal tunnel. White continuous line – flexor retinaculum; M – medial nerve; S – flexor digitalis superficialis tendons; D – flexor digitorum profundus tendons; FPL – flexor pollicis longus tendon; FCR – Flexor carpi radialis; white dashed line – Guyon tunnel; U – ulnar nerve; A – ulnar artery.
3.2 Distal carpal tunnel
With the wrist in slight flexion,
the probe should be moved more distally in a transverse plane from the previous position.
The distal carpal tunnel lies between two bony landmarks: the trapezium tubercle and the hamate hook.
The transducer should be shifted distally in the carpal tunnel,
for proper study of the medial nerve and the flexor tendons (Fig.
15).
Fig. 16: Dynamic scanning of the carpal tunnel.
.
3.3 Guyon tunnel
The Guyon tunnel is a fibrous-osseous structure formed by the flexor retinaculum and palmar carpal ligaments,
located medial and superficially to the carpal tunnel.
The tunnel contains the ulnar nerve,
artery and vein.
The ulnar nerve appears as a small structure,
of 2-2,5cm,
laying between the ulnar artery (appearing as an hypoechoic pulsatile structure) and the pisiform bone.
If the ulnar nerve is followed distally,
it is possible to identify its two branches,
the superficial sensory and the deep motor branches (Fig.
16).

Fig. 15: US transverse view of the Guyon tunnel. A – ulnar artery; white arrow – ulnar nerve; thin arrows – flexor retinaculum.


 form the medial border and extensor pollicis longus tendon (white line) forms the lateral border of the anatomical snuff box. The floor is formed by the scaphoid and trapezium bones.")


; yellow arrow – Lister tubercle; thin white arrows – extensor retinaculum.")

.")


