IRB approval and patients’ informed consent were obtained.
100 patients (77 females and 23 males,
mean age 46years,
range 32-70y) with RCCT (single calcification,
acute/post-acute phase,
no tendon tears) were randomized into two groups and were treated with two different US-guided percutaneous tecniques.
Group A (50 patients; mean visual analogue scale [VAS]=7.8) was treated using an US-guided 16G double-needle technique (local anesthesia,
washing with warm saline,
intrabursal steroid injection),
while group B (50 patients; mean VAS=7.4) was treated using a 16G single-needle technique (local anesthesia,
washing with warm saline,
intrabursal steroid injection).
Calcification appearance at US (fluid,
soft,
hard),
procedure time and ease of calcium dissolution (subjectively scored as easy=1,
intermediate=2,
difficult=3) were recorded.
VAS follow-up was performed at 1,
3,
6 and12 months.
Complication rate was noted.
Mann-Whitney U and Chi-square statistics were used.
INTERVENTIONAL PROCEDURE
Equipment
- One or Two 16G needles
- One 10-cm 18/20G needle (optional)
- Inox bowl (to collect the washing fluid)
- Sterile saline solution (100–200 ml) warmed to about 38–40°C
- Two syringes (20 ml and 3 ml)
- Lidocaine (10 ml)
- Steroid (1 ml, metilprednisolone acetate 40mg/ml )
- Plaster
- Ice pack
LOCAL ANESTHETIC INJECTION
The patient is either placed in the supine position (subscapularis and supraspinatus calcifications) or is prone (infraspinatus or teres minor calcifications),
as seen in Fig.3.
A correct US scan should demonstrate the target calcification (C) according to its major axis (Fig.4a,b). After sterile preparation of the skin and probe,
a small amount of local anesthesia is injected under US guidance and using an in-plane approach along the path of the needle (arrowheads), in the SASD bursa (asterisks),
and around the calcification (C) (Figs.4,5,6,). H humeral head.
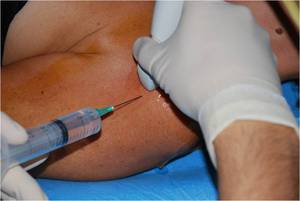
Fig. 3: A small amount of local aneshtetic is injected into the bursal space, with an in-plane approach.
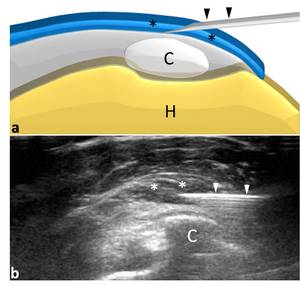
Fig. 4: Needle position(arrowheads) in the bursal space(asterisks);H humeral head, C calcification.
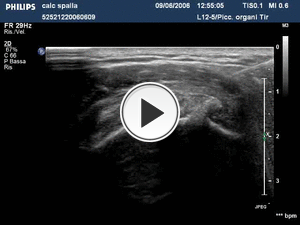
Fig. 5: The video shows the intrabursal injection of local aneshtetic.
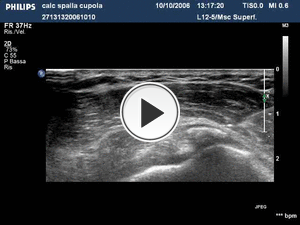
Fig. 6: The video shows the pericalcific injection of local aneshtetic.
DOUBLE-NEEDLE TECHNIQUE

Fig. 7: The first needle is inserted into the lowest portion of the calcification with a in-plane approach.
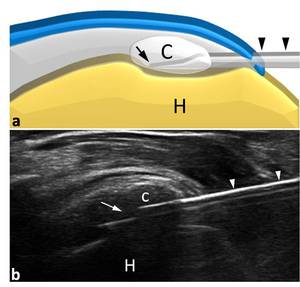
Fig. 8: The insertion of the first needle (arrowheads)into the lowest portion of the calcification (C), maintaining the bevel (arrow) open towards the probe. H, humerus.
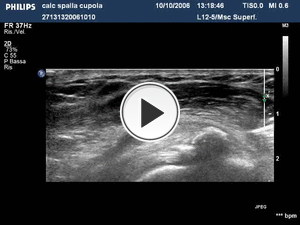
Fig. 9: The video shows the insertion of the first needle into the lowest portion of the calcification with a in-plane approach.
FIRST NEEDLE INSERTION
As shown in Figs.7,8,9 the first needle (arrowheads) is inserted into the lowest portion of the calcification (C),
maintaining the bevel (arrow) open towards the probe. H humerus.
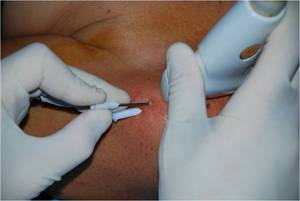
Fig. 10: A second needle is inserted into the calcification parallel and superficial to the first.
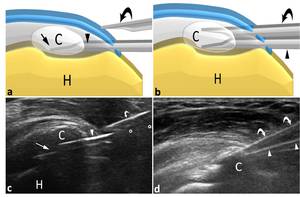
Fig. 11: A second needle (curved arrows) is inserted into the calcification (C) parallel and superficial to the first(arrowheads), and its tip is rotated 180° in order to create a correct washing circuit. Arrow, needle bevel opened upwards; circles, artifacts.
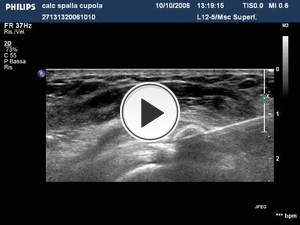
Fig. 12: The video shows the insertion of the second needle into the calcification parallel and superficial to the first, and its tip is rotated 180° in order to create a correct washing circuit.
SECOND NEEDLE INSERTION
A second needle (curved arrows) is inserted into the calcification (C) parallel and superficial to the first (Figs.10,11,12 arrowheads),
and its tip is rotated 180° in order to create a correct washing circuit.
As shown in Fig.11c,
the deeper needle needs to be inserted first,
to avoid artifacts (circles) caused by the second,
more superficial needle.
Needle bevel (arrow) is opened upwards.
Fig.11d shows both needles (arrowheads and curved arrows) within the calcification. H humerus.
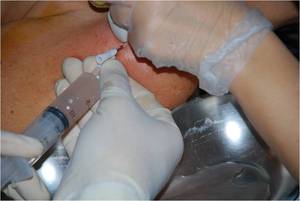
Fig. 13: A 20-ml syringe filled with warm sterile water is connected to one of the needles and a gentle, intermittent pressure is applied.

Fig. 14: A slight expansion of the calcification can be visualized during washing. Washing of the target continues until complete emptying of the calcification (C) is demonstrated. Arrowheads, first needle; curved arrow, second needle; H humerus.
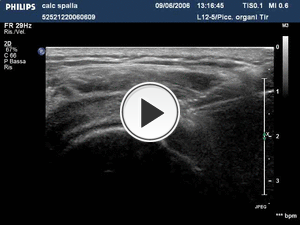
Fig. 15: The video shows the washing of the calcification, that continue until complete emptying of the target.
WASHING PROCEDURE
A 20-ml syringe filled with warm sterile water is connected to one of the needles (arrowheads and curved arrows) and a gentle,
intermittent pressure is applied.
If the positioning is correct,
a slight expansion of the calcification can be visualized.
If no washing fluid exits and the needles are correctly positioned,
an 18G spinal needle could be inserted into one or both 16G needles to slightly penetrate the target calcification,
creating enough space for circulation of the fluid.
The washing fluid exiting from the second needle is collected in the inox bowl,
positioned as shown in Fig.13.
Washing of the target continues until complete emptying of the calcification (C) is demonstrated,
as shown in Figs.14,15. Arrowheads first needle, curved arrow second needle, H humerus.
SINGLE-NEEDLE TECHNIQUE
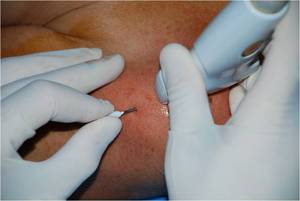
Fig. 16: The needle is inserted into the calcification with a in-plane approach.
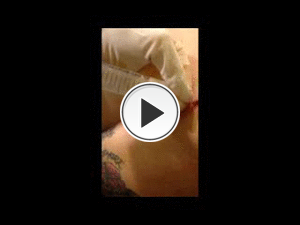
Fig. 17: A 20-ml syringe filled with warm sterile water is connected to the needle and a gentle, intermittent pressure is applied.
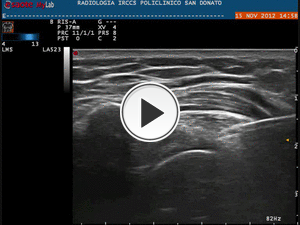
Fig. 18: The video shows the washing of the calcification, that continue until complete emptying of the target.
NEEDLE INSERTION
As shown in Figs.16 the needle is inserted into the the calcification, maintaining the bevel open towards the probe.
WASHING PROCEDURE
As shown in Figs.17 a 20-ml syringe filled with warm sterile water is connected to the needle and a gentle,
intermittent pressure is applied.
If the needle is correctly positioned,
during the washing a slight expansion of the calcification can be visualized and the sterile water into the syringe will bacame opaque because of the mixing of water and calcium (Fig.18).
If no washing fluid exits and the needle is correctly positioned,
an 18G spinal needle could be inserted into the needle to slightly penetrate the target calcification,
creating enough space for circulation of the fluid. Washing of the target continues until complete emptying of the calcification is demonstrated.
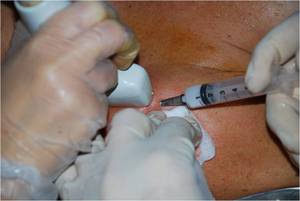
Fig. 19: Double-needle tecnique: at the end of the procedure one needle is removed and the 3-ml syringe is connected to the remaining needle.
Single-needle tecnique: at the end of the procedure the 3-ml syringe is connected to the needle.
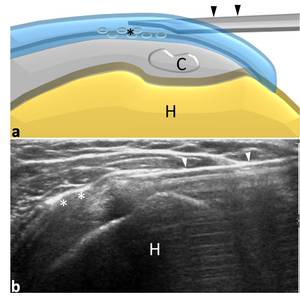
Fig. 20: The needle (arrowheads) is then displaced into the SASD bursa and 1 ml of steroid is injected (asterisks). H, humerus; C, treated calcification.
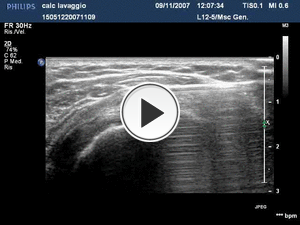
Fig. 21: The video shows the intrabursal injection of local steroid.
STEROID INJECTION
Double-needle tecnique
At the end of the procedure one needle is removed and the 3-ml syringe is connected to the remaining needle (Fig.19).
This needle (arrowheads) is then displaced into the SASD bursa (Figs.20,21) and 1 ml of steroid is injected (asterisks).
A plaster is then applied to the skin at the puncture site and an ice pack is placed over the shoulder. H humerus, C treated calcification.
Single-needle tecnique
At the end of the procedure a 3-ml syringe is connected to the needle (Fig.19).
The needle (arrowheads) is then displaced into the SASD bursa (Figs.20,21) and 1 ml of steroid is injected (asterisks).
A plaster is then applied to the skin at the puncture site and an ice pack is placed over the shoulder.
H humerus,
C treated calcification.
POST-PROCEDURAL CARE
The patient is kept under observation for at least 30 min.
The ice pack over the treated shoulder should be maintained for at least 2 h.
Patients should avoid overhead movements and the carrying of heavy weights for up to 15 days.
Pain may occur after treatment and is managed with oral NSAIDs.
Post-procedural bursitis is seen in about 15% of patients within approximately 2 months after treatment.
In these cases,
an intrabursal steroid injection may be useful.


 in the bursal space(asterisks);H humeral head, C calcification.")

into the lowest portion of the calcification (C), maintaining the bevel (arrow) open towards the probe. H, humerus.")

 is inserted into the calcification (C) parallel and superficial to the first(arrowheads), and its tip is rotated 180° in order to create a correct washing circuit. Arrow, needle bevel opened upwards; circles, artifacts.")

 is demonstrated. Arrowheads, first needle; curved arrow, second needle; H humerus.")

 is then displaced into the SASD bursa and 1 ml of steroid is injected (asterisks). H, humerus; C, treated calcification.")